Left alone, a backyard garden can get out of hand fast. Tomato plants can overgrow into an impenetrable tangle of collapsed and broken branches, vining squashes and cucumbers can spill out of beds and overtake everything in a 30-foot radius, inconsistent watering can lead to such problems as blossom end rot or outright plant death, and too much sunlight can scald plants and fruits alike.
While there is something almost magical about an overgrown “chaos garden” a laissez-faire approach can cause a garden to reach a sort of point of no return after which yields decline, vegetables are difficult to access for harvest, and diseases are difficult to spot and diagnose early. It follows that an investment in at least minimal garden infrastructure is, if not essential, a worthwhile endeavor that will make life easier and in some cases boost plant health and subsequently overall yields. Here are the four types of garden infrastructure that have been invaluable game changers during my own gardening journey.
1. The Humble Stake
One of the most versatile pieces of garden infrastructure, the stake is also the cheapest. A stake can be made of pretty much anything somewhat thin and fairly rigid. You can spend money and buy metal, fiberglass, or bamboo stakes, or you can go the free/almost free route and use tree branches or strips cut from scrap lumber.
Installation and use is easy. Jam the stake into the soil next to a plant that needs support and tie the plant to it as needed. I recommend using some sort of elastic ligature to secure the plants as it will stretch as the plant grows and not cause constriction and damage. Longer stakes arranged into a teepee-like structure are an excellent support for vining varieties of peas and beans.
I prefer stakes for shorter, bush type plants that can produce heavy fruits which will snap branches if allowed to go wild. These include peppers, determinate tomatoes, and bush varieties of squash and cucumbers.
Some gardeners prefer to use tomato cages for their smaller, bush variety tomatoes and while I’m sure a good tomato cage does its job, the issue is added cost. Even if tomato cages can be found for an exceptionally low price, say $5 each, the cost becomes fairly significant when you have 10 or more tomatoes to control. With a little time spent scavenging, stakes can be had for free which frees up resources for the purchase of such garden staples as soil amendments and fertilizers.
2. Trellises
Vining cucurbits (squashes, pumpkins, and cucumbers) as well as indeterminate varieties of tomatoes will quickly overtake a small-space garden if not given vertical structure to climb. This is where trellises become invaluable.
The design of a trellis can vary greatly depending on the layout of the garden, budget, and available materials. For example, a quick, cheap, and easy trellis can consist of a rough web of twine or rope stretched tightly between sturdy posts. This is the approach I took when caging my Seminole Pumpkins into their 6’x6’ garden bed.
I simply affixed a length of 2×3 lumber to each corner of the bed, installed a a series of eye hooks on each post, and ran my line through these and around the posts to for a crisscrossed grid of rope around the entire bed as pictured below.
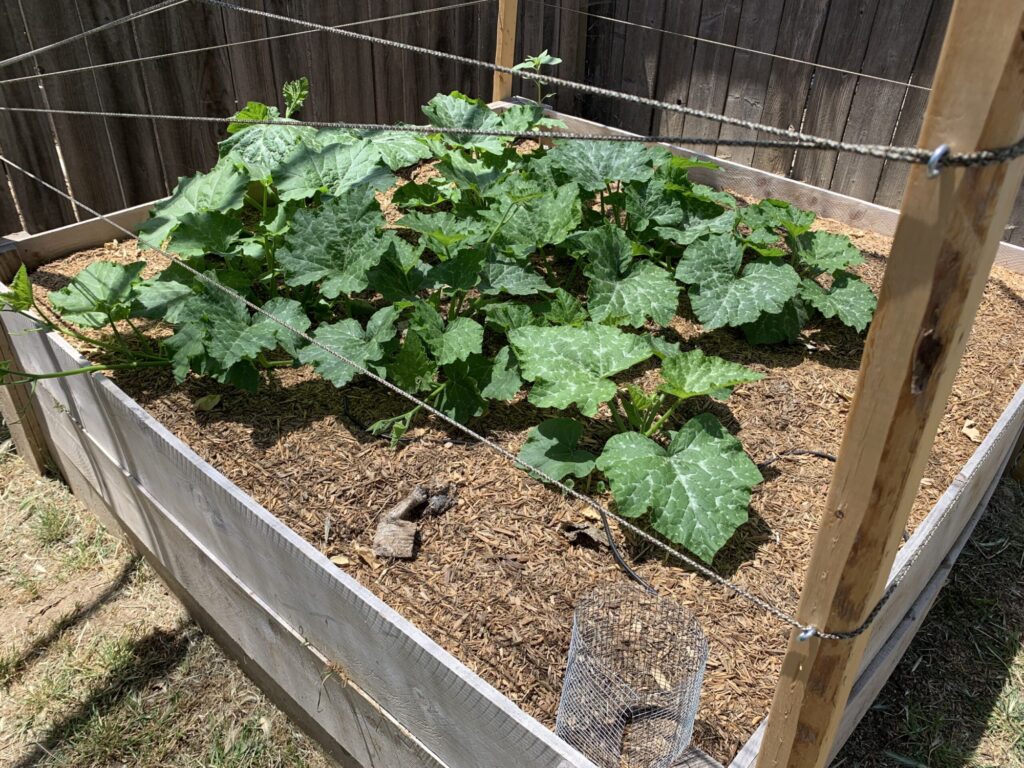
As the pumpkin vines grow to the edge of the bed, I will gently affix them to the ropes using a soft, flexible, garden twine. With a little coaxing, most of the vines should grow up as opposed to out.
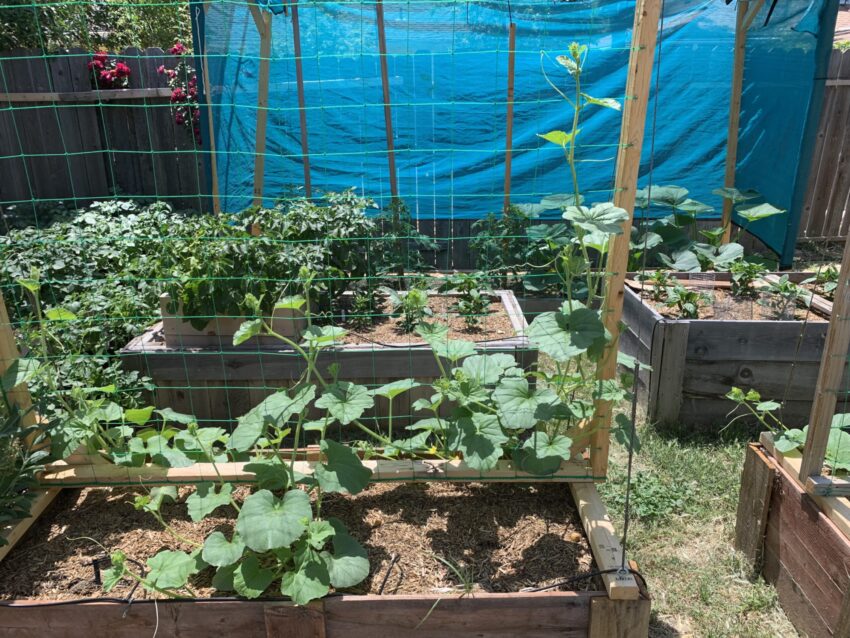
A slightly more involved design consists of a wooden frame over which some kind of mesh or grid is stretched. For example, the trellis I’m using to control my Armenian Cucumbers Is simply a frame made of 2x2s with an inexpensive nylon garden netting pulled tightly over it and secured with heavy duty staples. The entire structure took less than an hour to build.
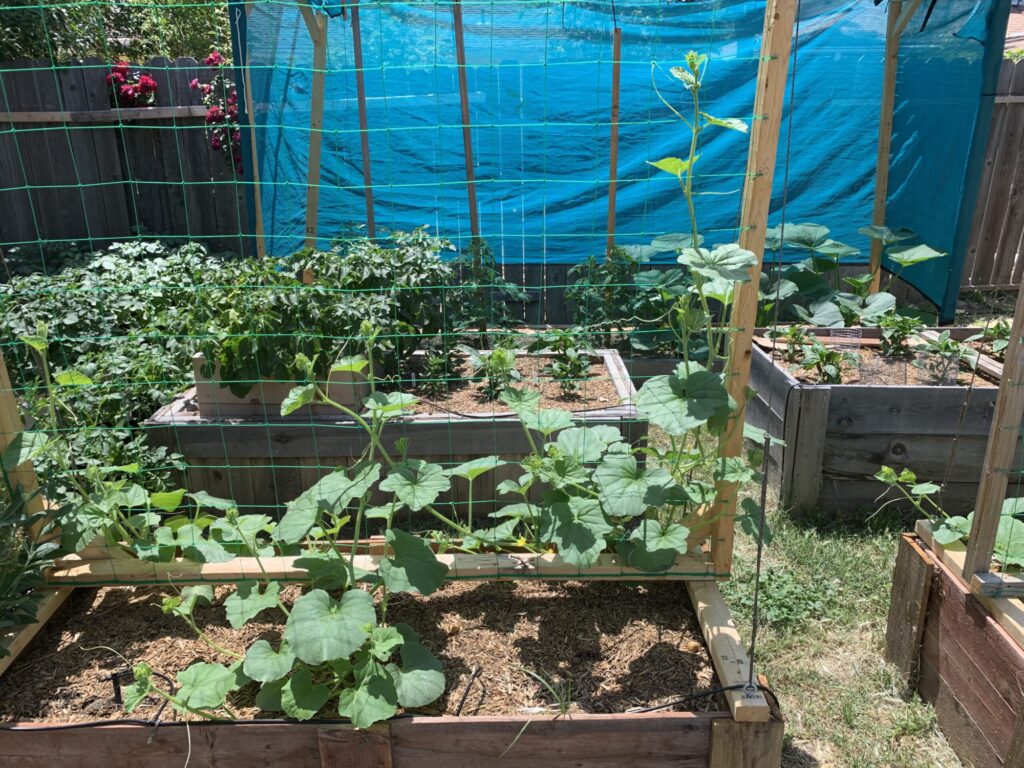
Other perfectly viable trellis materials include wood lattice, wire fencing, and cattle panels. Some of these materials can have a substantial up front cost, but can sometimes be salvaged or purchased second hand at a discount.
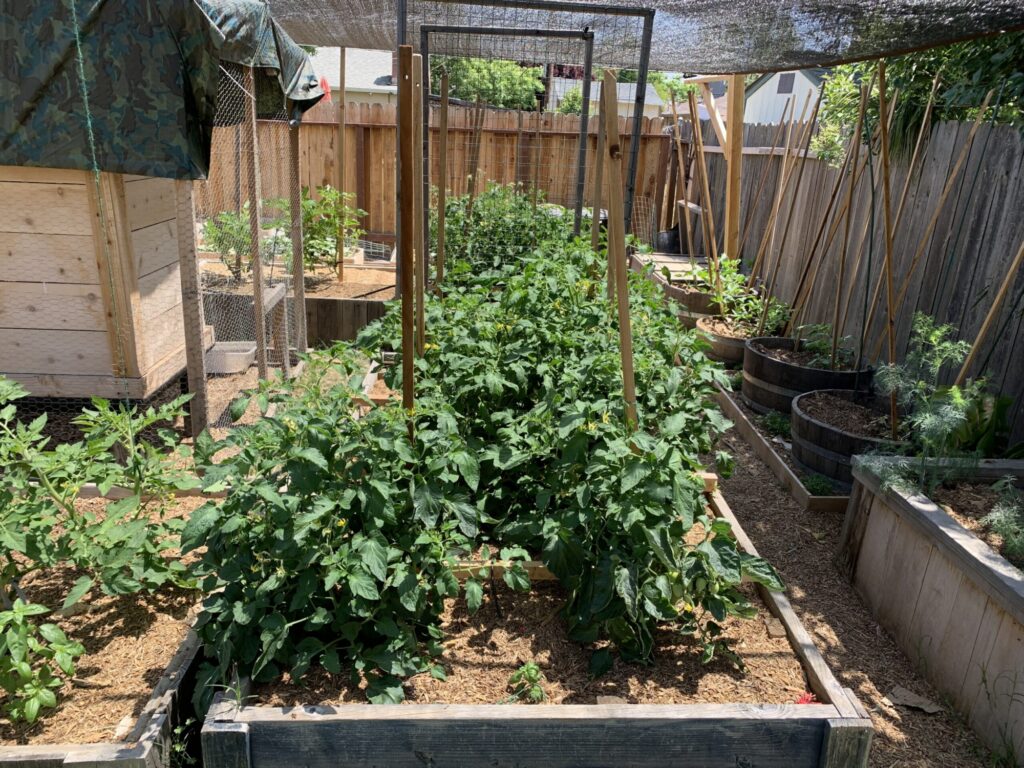
For indeterminate tomatoes (which can grow out of control quickly) I’m liking a trellis design known as the drop string trellis. This setup consists of a strong line (I used 1/8” wire rope) pulled tightly between sturdy posts 6 to 8 feet over the tomato bed. From this horizontal line, vertical lines or posts are “dropped” and secured into the soil. The photo below shows my take on the drop string trellis.
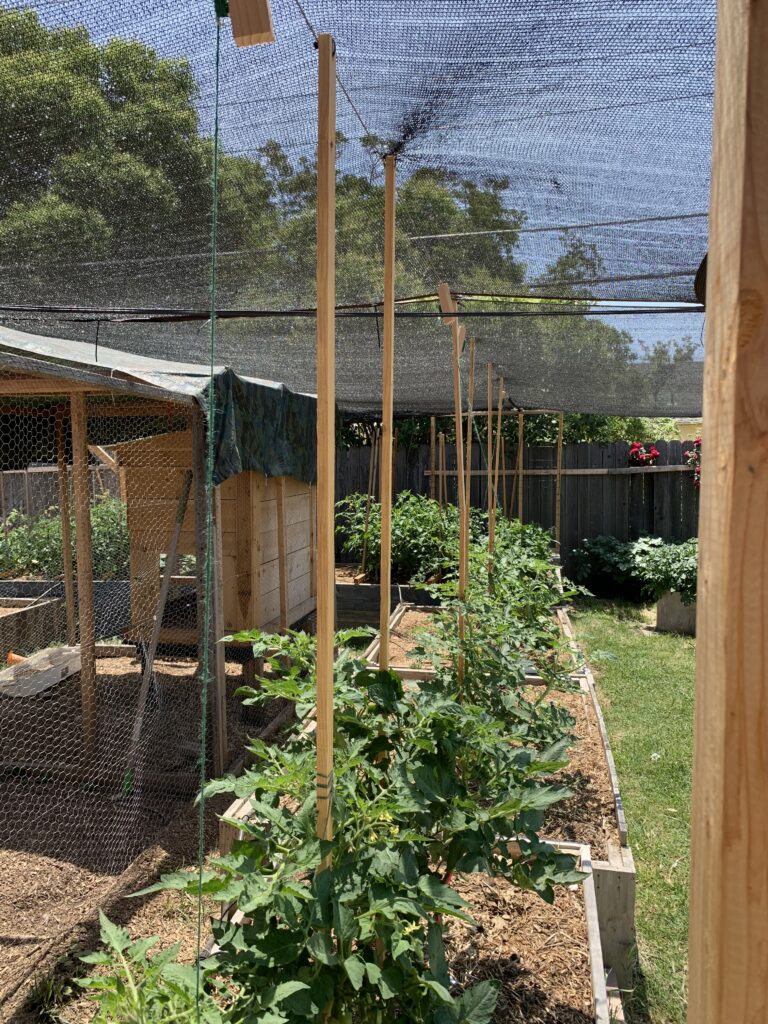
As the tomato grows, the gardener can prune the plant so that or two main stems can be affixed to the vertical line and/or the overhead line. For a how-to on pruning indeterminate tomatoes for compatibility with a drop string trellis, please check out this video.
3. Drip Irrigation
For gardeners in climates that actually get rain during the summer or those with a fairly small garden space, a drip irrigation setup is unnecessary. I, however, have found my inexpensive drip irrigation setup to be invaluable during the ultra hot and dry summers of the Sacramento area.
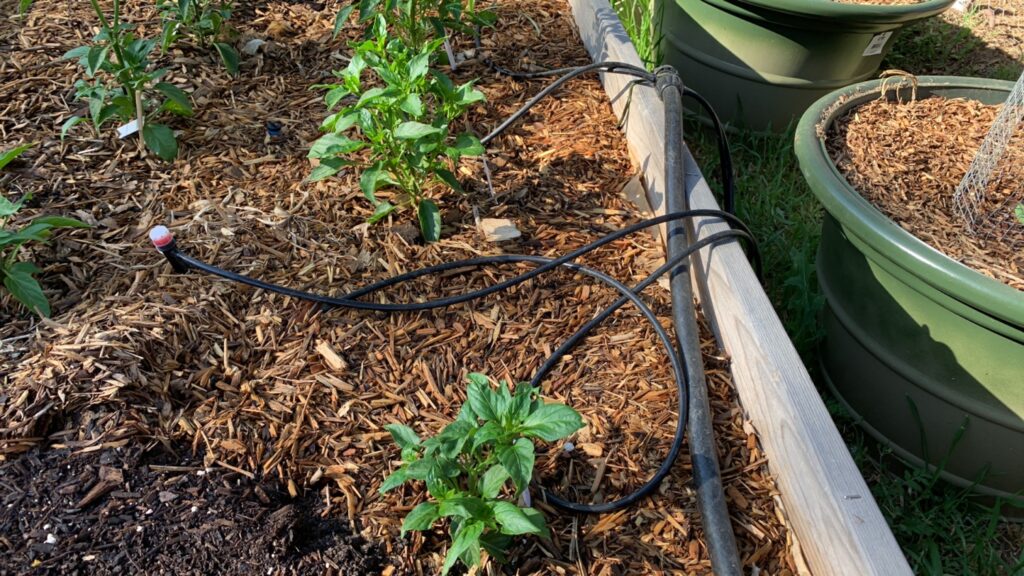
For watering to be effective in my climate, it has to be a thorough and deep watering. A quick surface watering with the garden hose will likely result in water evaporating before it has a chance to reach the roots. A drip irrigation system can be set so that the emitters are under a thick layer of mulch so as to deliver water directly to the soil. It’s also far less tedious to give a garden a thorough soaking when one doesn’t have to stand around holding a nozzle or wand for the amount if time it takes to effectively water. Just turn on the system (I prefer to do this after the sun goes down to reduce loss from evaporation) and walk away. Be sure to set a timer as a reminder to turn the system off after a given amount of time.
The installation of a simple drip system, while somewhat tedious, is actually a pretty simple task. Further, unless one’s garden space is a sprawling expanse, the one-time cost of materials to install drip irrigation isn’t all that onerous. I was able to purchase enough materials to irrigate my 400 square feet of growable space for a little over $100.
5. Mulch
2020, on top of being a terrible year for everyone in general, was a terrible year for our garden. After significantly expanding our raised bed footprint and ordering enough soil to fill them, I had depleted my project budget. As a result, I didn’t make allowances for mulch. Without mulch, our garden became what could be called parched and lifeless hellscape. The soil just wouldn’t retain moisture in the harsh summer heat and pretty much everything died.
The benefits of mulch are twofold. First, a good layer of mulch helps soil retain moisture longer thus preventing dry-outs between watering. Plants repeatedly wilting from lack of water are perpetually stressed and stress can result in anything to low fruit yields, to blossom end rot, to full on plant death.
A second benefit of mulch is it acts as a barrier between the sun and soil which helps preserve the crucial soil micro biome. It is said that sunlight is the best disinfectant, which is great, unless it’s garden soil being sterilized.
In addition to being a sort of shield for the soil, mulch is also food for the soil. As a mulch layer gradually breaks down, it adds nutrient rich organic matter to the soil, enriching it over time.
A multitude of different materials can be used for mulch including grass clippings, shredded leaves, chipped or shredded wood, and even cardboard (as long as it’s not glossy and the tape has been removed.
This year is the first year we decided to use wood mulch on our gardens and so far, I’m impressed by the results. As I draft this article in late May of 2023, we have not had any substantial rain in about a month and have had several stretches of 90+ degree temperatures. In spite of these conditions I have not yet had to turn on irrigation, the plants are thriving and the soil under the mulch is still damp.
It is important to only use wood mulch on the garden and not in the garden. Wood chips are exceptionally high in carbon, and high carbon materials tie up nitrogen during part of the decomposition cycle. Fully decomposed wood mulch, however, does add vital nutrients to soil. For this reason, it is important to avoid blending wood mulch into soil, using it as a top layer only.
A word of warning about the two most traditional mulch materials, straw and hay: Increasingly, straw and hay fields are being sprayed with a broadleaf herbicide family known as aminopyralids. These herbicides are engineered to kill pretty much any plant that isn’t a grass, are highly persistent in the environment, and can kill most common garden plants in concentrations as low as parts per billion. This notice from the North Carolina Extension Service gives detailed information on the dangers of persistent herbicide contamination. I recommend every gardener give it a read.
This isn’t to say straw and hay should be universally avoided for garden use. It is just extremely important to source these materials from a supplier that can 100 percent guarantee they are herbicide free. Failure to do so can render a garden toxic for years in some instances.
6. Shade Cloth
This is another optional piece garden infrastructure only truly necessary in places with exceptionally hot and sunny summers. In climates that actually have cloudy or rainy days during the summer and typically lack extended stretches of triple digit weather, shade cloth probably isn’t necessary. For our mostly treeless, south facing backyard in Sacramento, however, shade cloth is the difference between a lush, vibrant, garden and a parched, dead, wasteland.
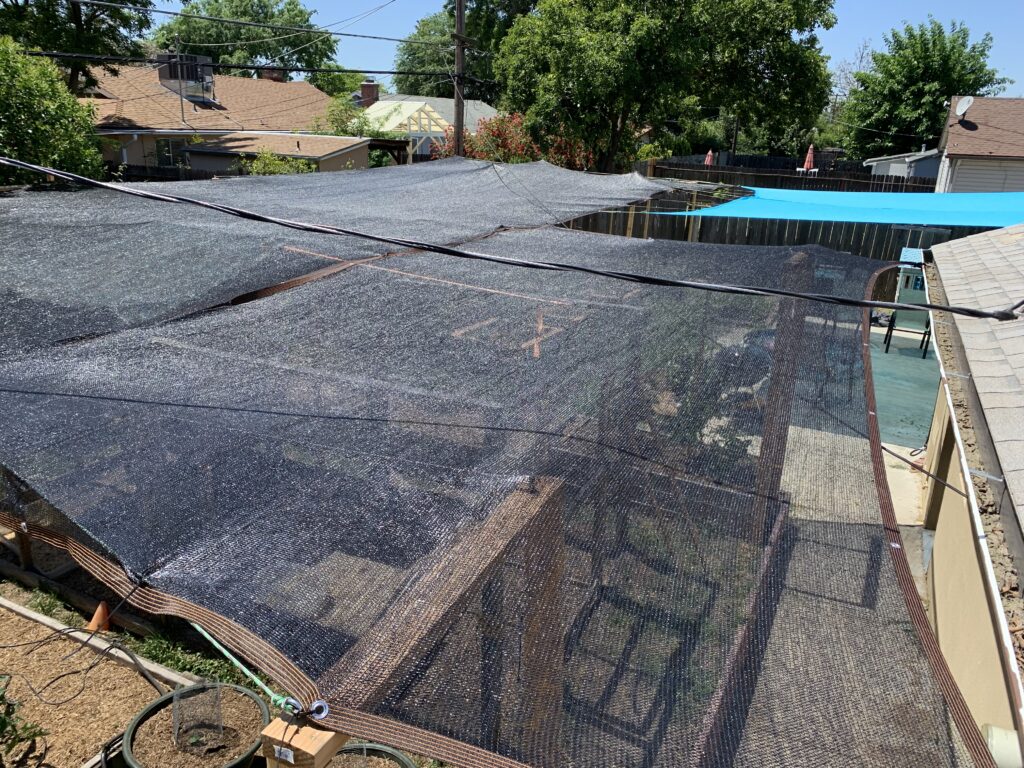
While plants rely on sunlight to live, there can be too much of a good thing and the scalding of both leaves and fruit can occur. I have found that 40 to 50-percent shade cloth (meaning it filters 40 to 50-percent of available sunlight) placed strategically to shield plants during the time of day when the sun is strongest does wonders to take the edge off, greatly reducing sun scald.
Whether it’s a handful of stakes to keep a few small tomato plants upright, an ornate wooden trellis to keep beans and peas in check, or a system of shade cloth and irrigation to combat hot and dry conditions, some investment in garden infrastructure is worthwhile. A little extra time and materials can do a lot to keep a garden organized, improve plant health, and increase yields.
